简介
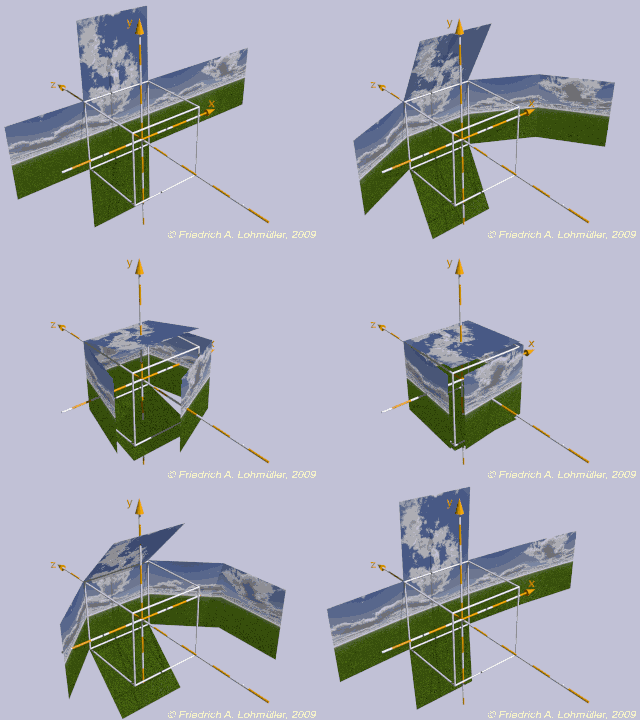
所谓krpano球面空间转换,可以理解在一个全景的六面体中,我们处于这个立方体的中心,那么我们所处的坐标就是(0,0,0)对应是x轴、y轴、z轴。

我们通常的观察点就是这个六面体的中心,那么我们现在做的就是在这个观测点上在x轴、y轴、z轴上进行位移。尽管目前krpano还没有引入深度信息,但也能做出一些有趣的视觉效果,例如所谓的matterport的前进方式。在最新版本的krpano中,引入了view.tx、view.ty、view.tz三个view元素的新属性,可实现上述三轴在球面空间内的位移。
将热点图片作为全景展示的位移做法
当我们直接把全景图切成六个面,然后以六个热点的方式放置在对应的位置。
那么每个面的热点图片实际应该显示为1000×1000的尺寸,这样才能完美地贴合。你也可以直接将六个面的图片切成1000见长的立方图片。然后在对应的scene中放入
|
1 2 3 4 5 6 7 8 9 10 11 12 13 14 15 16 |
<style name="sides_vis" enabled="false" alpha="1.0" scale="1.0" distorted="true"/> <style name="sides_inv" enabled="false" alpha="0.0" scale="1.0" distorted="true"/> <style name="sidepos_f" ath=" 0" atv=" 0"/> <style name="sidepos_l" ath="-90" atv=" 0"/> <style name="sidepos_r" ath=" 90" atv=" 0"/> <style name="sidepos_b" ath="180" atv=" 0"/> <style name="sidepos_u" ath=" 0" atv="-90"/> <style name="sidepos_d" ath=" 0" atv=" 90"/> <hotspot name="side_f_1" style="sides_vis|sidepos_f" url="pano_1_f.jpg"/> <hotspot name="side_l_1" style="sides_vis|sidepos_l" url="pano_1_l.jpg"/> <hotspot name="side_r_1" style="sides_vis|sidepos_r" url="pano_1_r.jpg"/> <hotspot name="side_b_1" style="sides_vis|sidepos_b" url="pano_1_b.jpg"/> <hotspot name="side_u_1" style="sides_vis|sidepos_u" url="pano_1_u.jpg"/> <hotspot name="side_d_1" style="sides_vis|sidepos_d" url="pano_1_d.jpg"/> |
这种将热点作为全景展示的方式在移花接木(21)- 无缝过渡两个场景有详细说明,可点击查看。
hotspot元素也是有tx、ty、tz三种属性的,要实现类似matterport的前进效果,就是对tz属性(深度方向)进行tween的操作。
|
1 2 3 4 5 6 7 8 9 10 11 12 13 14 15 16 17 18 19 20 21 22 23 24 25 26 27 28 29 30 31 32 33 34 35 36 37 38 39 40 41 42 43 |
<action name="loadpano2"> delayedcall(0, tween(hotspot[side_f_1].tz, -400); tween(hotspot[side_l_1].tz, -400); tween(hotspot[side_r_1].tz, -400); tween(hotspot[side_b_1].tz, -400); tween(hotspot[side_u_1].tz, -400); tween(hotspot[side_d_1].tz, -400); ); delayedcall(0.5, tween(hotspot[side_f_1].alpha, 0); tween(hotspot[side_l_1].alpha, 0); tween(hotspot[side_r_1].alpha, 0); tween(hotspot[side_b_1].alpha, 0); tween(hotspot[side_u_1].alpha, 0); tween(hotspot[side_d_1].alpha, 0); ); delayedcall(0, set(hotspot[side_f_2].tz, 400); set(hotspot[side_l_2].tz, 400); set(hotspot[side_r_2].tz, 400); set(hotspot[side_b_2].tz, 400); set(hotspot[side_u_2].tz, 400); set(hotspot[side_d_2].tz, 400); ); delayedcall(0.1, tween(hotspot[side_f_2].tz, 0); tween(hotspot[side_l_2].tz, 0); tween(hotspot[side_r_2].tz, 0); tween(hotspot[side_b_2].tz, 0); tween(hotspot[side_u_2].tz, 0); tween(hotspot[side_d_2].tz, 0); ); delayedcall(0.0, tween(hotspot[side_f_2].alpha, 1); tween(hotspot[side_l_2].alpha, 1); tween(hotspot[side_r_2].alpha, 1); tween(hotspot[side_b_2].alpha, 1); tween(hotspot[side_u_2].alpha, 1); tween(hotspot[side_d_2].alpha, 1); ); </action> |
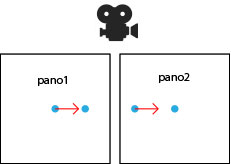
这两组热点图应该是相邻拍摄点拍摄的,

我们让pano1的六个热点图片的tz从0开始tween到-400。在这个变化的过程中,pano2的六个图片也要首先设置到400,然后在0.1秒后开始变化到0。当然也要兼顾到热点的透明度同步变化。
最终演示效果如下。
使用view.tx、view.ty、view.tz进行偏移
代码如下
|
1 2 3 4 5 6 7 8 9 10 11 12 13 14 |
<action name="ShiftView"> if(%1 == 'in', tween(view.tx, 900,3,easeinbounce); tween(view.ty, 900,3,easeinbounce); tween(view.tz, 900,3,easeinbounce); set(layer[tuur].onclick, ShiftView(out)); , tween(view.tx, 0,3,easeoutbounce); tween(view.ty, 0,3,easeoutbounce); tween(view.tz, 0,3,easeoutbounce); set(layer[tuur].onclick, ShiftView(in)); ); </action> |
这个效果相当于观察点从立方体的中心位移到立方体某个角的附近。
下面这个演示也是在全景立方体内进行偏移。
代码如下
|
1 2 3 4 5 6 7 8 9 10 11 12 13 14 15 16 17 18 19 20 21 22 23 24 25 26 27 28 29 30 31 32 33 34 35 36 37 38 39 40 41 42 43 44 45 46 47 48 49 50 51 52 53 54 55 56 57 58 59 60 61 62 63 64 65 66 |
<action name="ShiftView"> if(%1 == '1', tween(view.tx, -900,3); tween(view.ty, -900,3); tween(view.tz, -900,3); callwith(hotspot[htsp],tween(tx|ty|tz|depth,900|-900|-900|100,3)); callwith(hotspot[logo],tween(tx|ty|tz|depth|ry,1100|-900|-900|100|-28,3)); tween(view.hlookat,160,3); tween(view.vlookat,-20,3); ); if(%1 == '2', tween(view.tx, 0,3); tween(view.ty, 0,3); tween(view.tz, -900,3); callwith(hotspot[htsp],tween(tx|ty|tz|depth,0|0|-900|500,3)); callwith(hotspot[logo],tween(tx|ty|tz|depth|ry,0|0|-900|500|-28,3)); wait(3); tween(view.hlookat,180,3); tween(view.vlookat,0,3,, tween(view.tx, 0,3); tween(view.ty, 200,3); tween(view.tz, -900,3); callwith(hotspot[htsp],tween(tx|ty|tz|depth,0|200|-900|500,3)); callwith(hotspot[logo],tween(tx|ty|tz|depth|ry,0|210|-900|500|-28,3)); ); ); if(%1 == '3', tween(view.tx, 900,3); tween(view.ty, 900,3); tween(view.tz, 900,3); callwith(hotspot[htsp],tween(tx|ty|tz|depth,-900|900|900|500,3)); callwith(hotspot[logo],tween(tx|ty|tz|depth|ry,-880|880|900|500|-20,3)); tween(view.hlookat,-40,3); tween(view.vlookat,50,3,, tween(view.tx, 700,3); tween(view.ty, 600,3); tween(view.tz, -800,3); callwith(hotspot[htsp],tween(tx|ty|tz|depth,-500|500|-900|500,3)); callwith(hotspot[logo],tween(tx|ty|tz|depth|ry,-480|480|-860|500|-28,3)); tween(view.hlookat,-140,3); tween(view.vlookat,30,3,, tween(view.tx, 0,3); tween(view.ty, 0,3); tween(view.tz, -800,3); callwith(hotspot[htsp],tween(tx|ty|tz|depth,0|0|-100|-500,3)); callwith(hotspot[logo],tween(tx|ty|tz|depth|ry,345|0|-100|-500|0,3)); tween(view.hlookat,-180,3); tween(view.vlookat,0,3,, tween(view.tx, 0,3); tween(view.ty, 0,3); tween(view.tz, 0,3); callwith(hotspot[htsp],tween(tx|ty|tz|depth,0|0|0|500,3)); callwith(hotspot[logo],tween(tx|ty|tz|depth|ry,0|0|0|500|0,3)); tween(view.hlookat,0,3,easeOutExpo(20,20,20)); tween(view.vlookat,0,3,easeOutExpo); ); ); ); ); </action> |
下面这个演示和上面的基本一致,只是换了实际的立方体切片进行演示。
第五个演示的核心代码与上面两个演示大致相同,这次不是立方体切片,而是全景视频。
第六个演示主要是场景切换时的一些视觉效果。
代码如下
|
1 2 3 4 5 6 7 8 9 10 11 12 13 14 15 16 17 18 19 20 21 22 23 24 25 26 27 28 29 30 31 32 33 34 |
<action name="Move"> if(%1 == back, tween(view.ty,100,1,easeoutquad); tween(hotspot[htsp].ty,100,1,easeoutquad, tween(view.tz,900,0.7,easeoutquad); tween(view.ty,0,0.7,easeoutquad); callwith(hotspot[htsp],tween(tz|alpha,700|0,1.1,easeoutquint)); delayedcall(0.2, loadscene(scene_1, null, MERGE, ZOOMBLEND(0.4)); lookat(180); set(view.tz,-500); tween(view.tz,0,2); delayedcall(2, lookto(0,0,90)); ); ); , tween(view.ty,100,1,easeoutquad); tween(hotspot[htsp].ty,100,1,easeoutquad, tween(view.tz,-900,0.7,easeoutquad); tween(view.ty,0,0.5,easeoutquad); callwith(hotspot[htsp],tween(tz|alpha,-700|0,1.1,easeoutquint)); delayedcall(0.2, loadscene(scene_2, null, MERGE, ZOOMBLEND(0.4)); tween(view.tz,0,2); delayedcall(2, lookto(180,0,90)); ); ); ); </action> |
主要是往上提升然后往前走的视觉效果,
先是对view.ty进行tween的变化,然后1秒之后对view.tz进行tween动画。
第七个演示
以下隐藏内容只提供VIP赞助会员,VIP会员请登陆查看
案例下载
以下隐藏内容只提供VIP赞助会员,VIP会员说明请查看置顶文章